When I get a pattern that I really like, I find myself using it again and again, playing with color and fabric to create as many different garments from it as I possibly can. I find that the more effective way of doing this is altering the sleeves; it results in completely new dresses and tops from the same tried and tested pattern that really works for me.
But sleeves can be tricky… They can be scary even! So we are going to transform long winterish sleeves together, step by step, into a puff sleeve, a roll-up sleeve and a flutter sleeve. Let’s play with our patterns!
We are learning how to alter the sleeve pattern only. Once you have the type of sleeve you want, you just need to attach it to the bodice as you would normally do.
Hints for the Sleeve World
For all three, the basic thing you need to do is to shorten the sleeve pieces. This sounds obvious, but if you understand how the pattern of a sleeve is structured, the end result will be miles better!
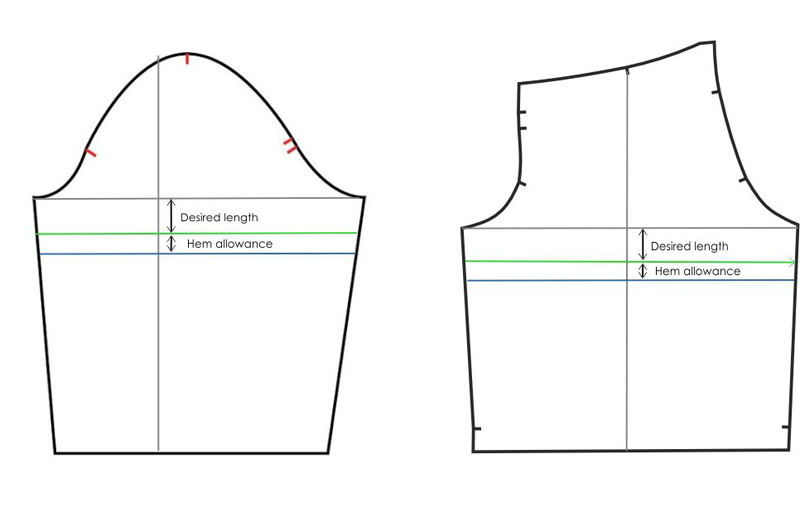
A sleeve, both set-in and raglan, is always drawn around two lines which cross each other: the biceps and the grainline. Everything above the biceps is the sleeve cap, everything below is the arm.
1. You need to decide how long you want your sleeves to be by measuring from the inside of the armhole. This length you need to measure on the pattern, along the grainline. Draw a line parallel to the bicep line across the width of the sleeve at your desired length and trace the new pattern piece on a paper.
2. Normally, a sleeve is not a perfect rectangle, but the arm narrows down towards the cuff. We need to take this into account when shortening a sleeve, as the new cuff, when turning, has to fit the shape of the sleeve above it. Thus, you need to have two pieces of paper: the original pattern (yellow) and the altered one (green), and follow these simple steps:
Puffed Short Sleeve
1. Once you have the length line drawn on the pattern, add 1.5″ extra for the casing where the elastic will be strung, as hem allowance.
2. You just need to sew the cuffs by folding the fabric twice, as shown, to form a casing with no fabric on show. Press flat, topstitch and string the elastic in and out with a safety pin.
Roll-Up Sleeve
This is a sleeve designed to be rolled or folded up to form a cuff. The result can be quite cute, don’t you think?
1. To make it add more length for the hem– about twice of what you want the actual roll-up cuff to be. I would say that 2.5″ or 3″ should be enough for a child sleeve.
2. Now sew the hem. Fold the bottom edge of the sleeve to the inside by 2″, pressing towards the wrong side. Then the sleeve again to the inside, press, and fold it to the right side to form the roll-up cuff.
3. No need to topstitch the roll-up, as it will be kept in place by the side seam.
Flutter Sleeve
A flutter sleeve is short, flowy and perfect for a summer top or dress. We like really short flutters here!
1. Mark a point on the grainline about 1″ above the bicep line. The result is a tiny sleeve, which does not surround the arm.
2. Then draw vertical lines dividing the sleeve into several sections, and cut them along from the hem almost to the end of the sleeve cap. Spread the pieces apart to create width and fullness at the bottom. The more sections and the wider the separation, the fuller the flare will be. Let’s be bold!
3. The final shape of your sleeve pattern may be a bit weird, but that is because all of the fullness in this sleeve is at the bottom. The sleeve cap will fit the shape of your bodice perfectly.
4. Cut the fabric following the new pattern and, using a medium width zigzag stitch, stitch over the hem line to prevent it from fraying.
Let’s go and sew the summer up!