Jen Carlton Bailly is getting the kids ready for back to school with some super easy, super-cute sewing projects.
This skirt/dress came about because in the mornings, Portland, Oregon is freezing but by mid-afternoon is nice and warm. My daughter loves long skirts but her legs get chill and it’s hard to play at school in a long skirt. One day it hit me– I use to have shorts (in the ‘90’s) that had the tab on the side that let me roll them up from capri pants into shorts. Perfect! The convertible skirt was born…
A note about sizing:
The measurements in this tutorial are for a size 6/7. However, this is very simple to adjust by simply adding or cutting away fabric. In this case, I used the width of the fabric (44 inches) cut down to 30 inches as the waist. The length of the fabric– 26 inches (3/4 of a yard)– became the length of the skirt. If you need larger or smaller simply measure your waist and add nine to ten inches for the seam allowance and shirring. Since this is a one-seam skirt it’s very easy to add to or make smaller! Need it longer? Try adding a contrasting band at the bottom.
Supplies:
- ¾ of a yard of knit fabric cut to 30 inches by 26 inches (I used Just For Fun from Jay-Cyn Designs for Birch Organic fabrics)
- Elastic thread
- Ball point needle (used for sewing knits)
- Soft measuring tape
- Serger or zig-zag foot
- Snaps or buttons
- 2 leather scraps
Step One:
Fold the fabric in half right sides together and sew using a zig-zag stitch (or serge the seam using a ¼ inch seam allowance). Turn right side out.
Tip: If you are using a serger, here is what I do to keeping those ends neat: Simply leave a long tail; using a large eye needle weave the tail back through the seam.
Step Two:
Wind the elastic thread onto your bobbin. It’s not hard I PROMISE. You can do it. Shirring is super easy. As you’re winding you don’t want to stretch it tight or make it too lose. Just lightly stretch it onto the bobbin.
Step Three:
Using the edge of the pressure foot sew a straight line (the thread on top is regular thread, the elastic is only in the bottom). The fabric will gather as it’s sewn. When starting the next row, slightly stretch the fabric as you go.
The result will be perfect gathers or shirring. Give it a light steam and it will shrink up a bit. The more rows you do the tighter the waistband. Notice that I did not finish the top of the waistband. When using a high quality knit such as this, there really is no need. It wont fray at all! Save yourself some time and try it this way!
Step Four:
Figure out how much you want the skirt to bunch up on the sides. To figure this out, simply try it on and use the soft measuring tape to scrunch it up and get the length that the strap should be. Use a pin to mark where the strap will start. Use a ruler to ensure the other side is even.
Step Five:
Add the snap to the leather strap. Follow the instructions that came with the snap setter.
Attach the strap to the inside of the skirt. This may seem impossible but as long as the skirt isn’t much longer then 26 inches it will work. Before you attach it double and triple check that you have the strap and the snap going in the right direction. Trust me. Checking just once won’t be enough.
Then it’s done! The One-Seam Super Easy Convertible Skirt.
The first thing she did when she put it on was pull it all the way up into a dress. I instantly had a flash back to myself doing the exact same thing with all of my skirts. (Sometimes I still do!)
Experiment a bit with the length of the tab. Make it shorter to gather more of the skirt up. Try out different fabric types. Experiment with buttons instead of snaps!
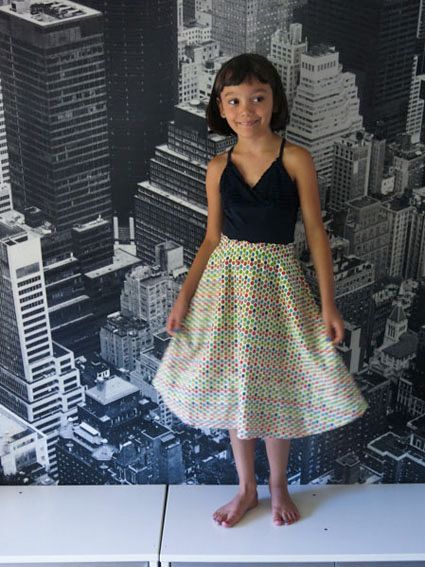
Here it is long… I was a little worried that it would be hard for her to walk as it looks super slim, but it wasn’t at all. She loved it this way best because it kept her legs warm and she thought it looked like a ball gown. Oh, to be six again!
I hope this tutorial helps you to try a few new things! It’s just a super easy way to add a new piece to the closet without too much time.
While I had the elastic thread in my machine, I thought I’d make a few more skirts for her. Using one of her favorite “twirly” skirts– a.k.a. a skirt cut on the bias– I cut out two more.
Folding the one yard piece of fabric in half I laid the skirt out along the folded edge. I traced it giving it a ¼ inch seam allowance and then cut it out.
I serged up the sides with the right sides together.
Using the same waist band technique as above a skirt was made in less then 30 minutes.
It went so quickly I made another. This one happens to be my favorite… The fabric is to die for!
I didn’t have enough fabric for this one and had to improvise with how I cut it out. I actually am glad because I love how it turned out. The campers look like they are in motion!