Darts are deceptively simple things. Those little sewn triangles of fabric may seem like just one small feature of a sewing pattern, but they are actually responsible for the basic structure of almost any garment. Knowing just a little bit about them will help you better understand your sewing patterns and give you more confidence to make alterations.
Let’s start by thinking about the female body. Imagine an average female body in your mind, but instead of thinking about it as a body, think about it as a geometric shape. What can we say about it? Well first, like any object in space, it has three dimensions: height, depth, and width. But it’s a rather complex three dimensional shape, isn’t it? It’s not a simple shape like a cylinder; it curves in and out all over the place. The challenge of making a fitted garment is sculpting a piece of fabric around all of these curves, and darts are the tool to do just that.

Curves to be aware of when making a garment.
Take a look at this dress form and notice where it curves. The biggest curves are obviously the bust and the derriere. Then there are the more subtle curves of the upper back and the lower belly. All of these need to be accommodated in a fitted garment.

A difference of 6 inches between the bust and waist.
The high point of each of these curves is known as the apex. Let’s say the measurement at the apex of the bust here is 36 inches, and the waist is 30 inches. Now imagine a very simple shapeless top on this dress form. It’s basically a cylinder of fabric that hangs straight down from the bust like a sack, with some holes for the arms and head, right?
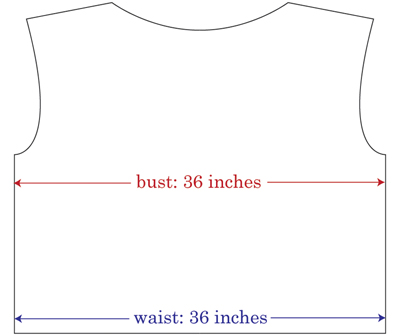
A plain, shapeless bodice.


But when you add a dart, you can remove some of that extra fabric at the waist. In this case, we’ve added two 3 inch wide darts, removing a total of 6 inches from the waist. Once the dart is stitched, the waist would be 30 inches and the bust would be 36 inches. The top would be fitted exactly to the waist and bust: in fact, it would be pretty much skin tight!

Darts control fullness at the waist while keeping the fullness at the bust.
This method of removing fullness using darts is called dart control, and it is the foundation of clothing design. In a very basic fitted dress, the most common darts are shown below. Notice how the tips of each dart point to the apex of each of the curves we noted earlier. The designer can add darts, remove darts, or rotate them around the apex in numerous ways to achieve different designs.
The wider the dart is, the more fullness you will get at the apex. So a big, wide dart here would accommodate a large, full bust, while a smaller dart would fit a smaller, less full bust. You can use these principles to make adjustments to your patterns in order to get a better fit if you have a large or small bust. If you look at the typical darts shown here, you will notice that the larger curves we talked about (the bust and the butt) have wider darts.

Some typical darts on a dress.
You may be wondering about all those sewing patterns you’ve used that have no darts whatsoever. But they too were most likely designed using the principles of dart control. There are lots of ways to control fullness in a design, such as gathering, tucks, pintucks, or pleats. They work in much the same way, by removing a certain amount of fabric when they’re stitched. So once a pattern is created using darts, the darts can be converted into one of these other design details very easily.
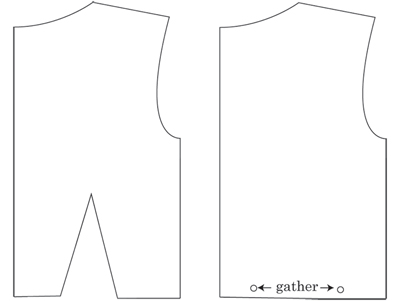
Darts can be turned into gathers.
A dart can also be converted into a seam! Take a look at this version. It starts out with a dart at the waistline. But if we draw a line from the apex of the dart up to the shoulder, then cut along that line, we now have two separate pattern pieces. If we sewed them back together along the seam we’ve just created, the effect would be the same as the dart. This is how we get a princess seamed bodice, for example.
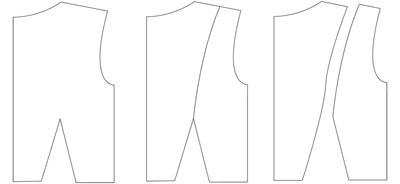
Darts can be turned into seams.
This is just a crash course in the principles of designing with dart control! If you’re interested in learning more about the subject, I highly recommend the accessible yet comprehensive book Make Your Own Dress Patterns by Adele P. Margolis. It’s a really delightful look into the multitudes of things you can do with darts.