Shelly Figueroa from Patterns by Figgy’s and our Best Home Ideas Editorial Board created this cute art smock tutorial for some Back to School fun. Now you can protect all of the new clothes you’re sewing with a cute smock, so kiddos can make a big, creative mess! Enjoy today’s tutorial!
My youngest son is preparing to begin his very first year of preschool. I know for a fact I’m more nervous about this than he is. He’ll be attending an “art” focused school that teaches a “learn by play” curriculum. When I first visited the school the teacher said “If you choose to send your son to our school I will warn you, he’ll come home filthy.” That made me so happy because:
1. Most of his clothes are already filthy (he’s a boy) and…
2. …To me that statement means he’s going to LEARN.
She also spoke about how they are always looking for “greener” donations and ideas to have in the classroom. My first thought being in the art school was “art smock.” I’m happy to have the chance to share this quick & fun art smock tutorial with you so that you can also create one for your child to wear. (Bonus: it is a really nice donation for the classroom.)
You will need:
- Nice fitting Tee shirt from your son or daughter’s closet
- Ruler
- Tracing Paper
- Pencil
- 1- 1.5 yds of Fabric (depending on the size you make)
- Coordinating Thread
- Handmade bias tape using fabric or pre-packaged purchased bias tape (roughly 2 – 2.5yds depending on your smock size)
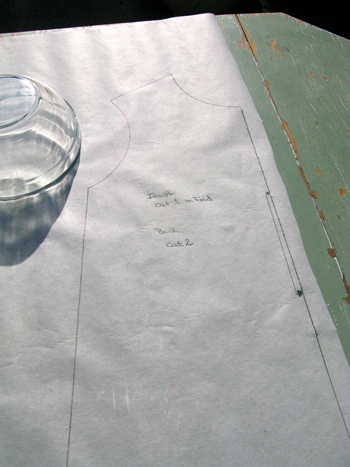
Creating the Pattern:
1. Lay your tracing paper on a flat surface.
2. Fold the tee shirt in half and tuck the sleeves inside the shirt in order to show the curve in the arm opening. 1” from the edge of the paper align the folded edge of the tee shirt
3. Place the ruler at the bottom of the neck opening and ½” away from the tee shirt edge. Draw a straight line from the neck opening to 4” past the hem of the tee shirt.
4. Place the ruler at the bottom of the tucked in arm hole ½” away from the tee shirt. You will now angle your ruler out so that as you come down the side of your tee you will slowly move the ruler 1.5” away to form the (A-line). For those of you who are very technical your ruler will be placed at a 15 degree angle.

5. Place the ruler with the 4” mark aligned with the bottom hem of the tee shirt and make markings from the folded edge of the tee to the side seam. This will help you create a nice straight line.
6. Find an item in your house that you can use as a guide to mark the arm openings. My mixing bowl was a perfect fit. Large yogurt containers are always helpful, too.
7. Place the guide ½” away from the sleeve curve and mark from the top of the shoulder to the side mark.
8. Repeat with the neck opening.
9. Once you have those two curves marked you can draw a straight line across to connect the two.
I suggest writing “Cut 1 on fold for FRONT and Cut 2 for Back” onto your traced pattern for later use.
10. Place your bowl at the bottom right corner and trace a small curve. I suggest writing “back” next to this line b/c when you cut the back you will be cutting this little corner in a curved shape. Feel free to curve as much or as little as you like.
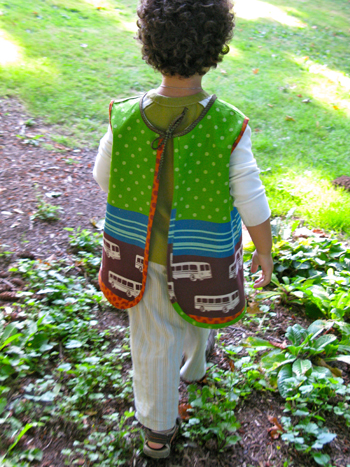
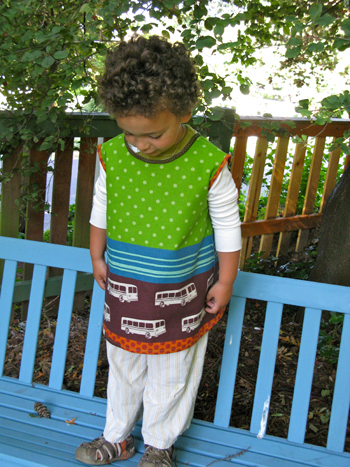
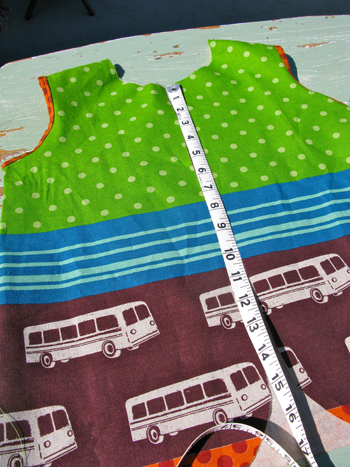
11. Time to cut your pattern! I chose a heavier weight fabric because I felt durability would be key to this project. I chose to use Echino “bus” fabric by Kokka.
12. For the Front panel you will cut 1 on the fold. For the Back panels you will need to cut 2 (not on the fold) and remember to trim off the blunt corner for a softer curved effect for the back.
13. Right sides together stitch the front to the backs at shoulder seam using a ½” seam allowance. Press the seam allowances towards the front.
14. Top stitch close to the seam and trim close to the stitching.
15. *Encase the armhole edges using the pre-made double fold bias tape or your handmade bias tape. Top stitch.
16. Right sides together using ½” seam allowance stitch the front to back at the side seams.
17. Measure the smock beginning from the neck opening on the left and around until to you reach the neck opening on the right. This will help you to estimate the amount of bias tape you will need.
18. *Encase the back and lower edge with bias tape. Top stitch.
19. *Encase the neck edge with bias tape, enclosing the raw edges, and leave 10” extended beyond each back neck edge to use as ties.
Top stitch, beginning at the end of one tie and around the neck, ending at the other end of the tie. I chose to use a “fancier” stitch just for fun. Another option here is to use twill tape.
All done!
I hope you enjoyed the tutorial. Have fun & Happy Sewing!
– Shelly