Handmade clothing is a work of art; carefully crafting a quality garment for someone else or yourself to wear is priceless. There are times, though– the holidays, a sudden growth spurt, preparing for a trip, 10 ballet tutus– when you need to produce multiple garments quickly and sewing takes on a sense of urgency. It might be tempting to stitch things together haphazardly or skip steps, but with a little planning you can efficiently sew multiple pieces of clothing (from the same pattern) in one sitting and be confident that they will be useful for a long time.
The goal of each of the following tips is to maximize the amount of time you spend actually sitting at the sewing machine, constructing quality clothing.
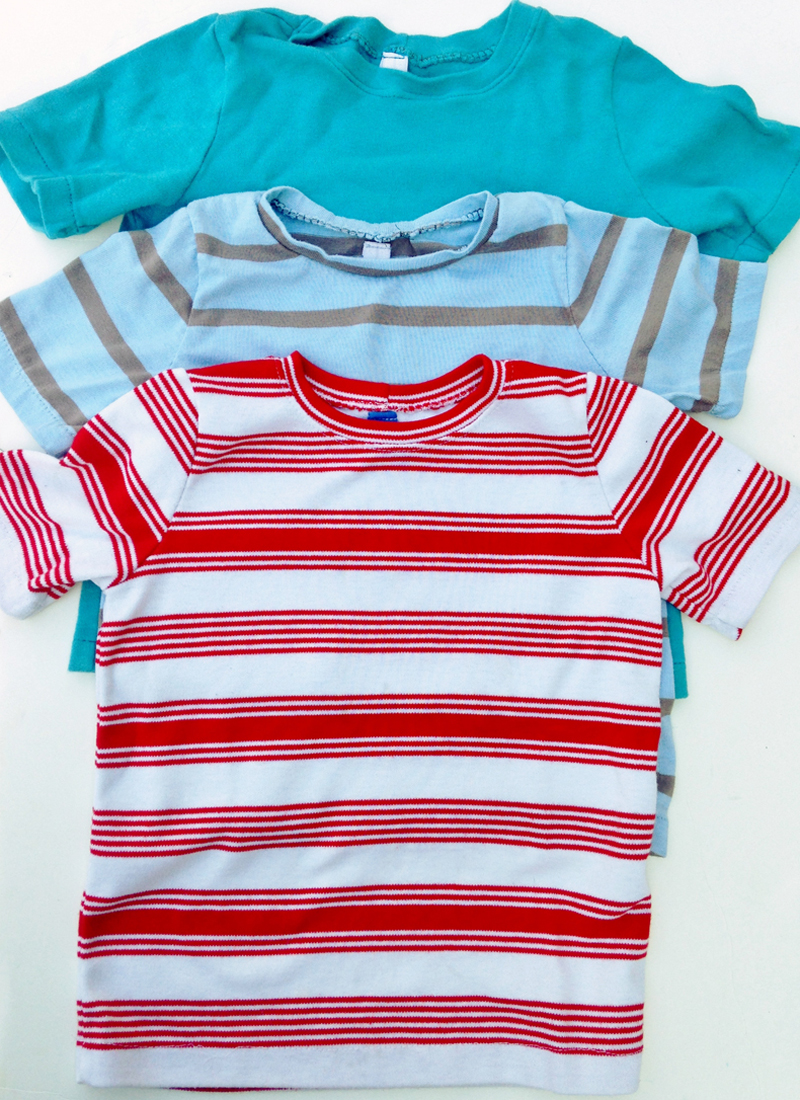
The example photos you will see throughout the post come from two different batches of Oliver + S School Bus T-shirts that I sewed this past summer which I divided by light and dark fabrics.
Before You Cut
1. Familiarity Breeds Confidence
Choose a familiar pattern, preferably one you’ve sewn more than once. If you already know how the garment goes together and what to expect from the instructions, you can be somewhat on auto-pilot as you sew. You may even know a few shortcuts to use based on your previous experience with the pattern, and you’ll be prepared for potential tricky spots.
2. Keep it Simple
A simple pattern (t-shirts, elastic waist pants, etc.) will come together the most quickly; however, these tips work for all patterns, regardless of difficulty. So, if you want to sew yourself three versions of your favorite dress, go for it!
3. Size Matters
Sizing is another reason to sew a familiar pattern. You’ll know if the pattern runs small, true to size, or large and you can adjust accordingly. No one wants to sew two button-down shirts in tandem only to find out the sleeves are too short or the neck is too tight. Make sure you’ve measured yourself (or the garment recipient) recently and have double-checked those measurements with the pattern sizing.
4. Curate Fabric Choices
Ideally, if you’re sewing for yourself or one of your kids, you’re building a wardrobe that works together in style and color. By choosing fabric colors that complement each other, you’ll not only develop a cohesive set of clothes, but also make it easier to minimize thread changes when you actually start sewing. At the very least, it’s best if all of the fabrics are in a similar range of dark or light. If you’re sewing gifts (such as pajama pants), you might be using the same fabric for every size and that will make things even easier!
Before You Sew
5. Get it Together
You may already do this when sewing just one garment, but with assembly line sewing, it’s especially important. Having everything you need ready ahead of time keeps your sewing flowing:
- Transfer all markings to patterns.
- Gather all notions (elastic, buttons, etc.).
- Have pattern pieces handy in case you need to refer back to them.
- Cut out any interfacing and attach it to fabric pieces (collars, cuffs, etc.) if possible.
- Put the correct size/type of needle in your machine and attach the correct foot.
- Serge/finish all edges that can be done ahead of time (hem edges, etc.).

6. Be Color Blind
It always annoys me when I have to stop sewing to change thread, so I try to do it as little as possible. Choose a thread color for the inside seams that will work for all of your chosen fabrics. Test it on scraps or on the first seam (if it’s short) and see if the thread is too noticeable in the seam allowances from the right side of the garment. Worry about color-coordinated thread only when you get to topstitching or other stitching that will be visible on the outside of the garment. And, who knows? Maybe your interior thread will be a great contrast and you won’t have to switch at all!
7. Wind ‘em Up
Depending on how large your garments are and how many of them you’re sewing, wind two or three bobbins with your inside seam thread (tip #6), plus bobbins for every color you will need for topstitching. It’s difficult to estimate how much bobbin thread you will need, but there are always to use that thread later.

8. Stack in Sets
Create a separate stack of cut fabric pieces for each garment you will be sewing. Within each stack, place the pieces in the same order. Example: front, back, neck band, sleeves. If you want to get really crazy, stack them in the order you’ll be sewing them! This is one way to help you avoid sewing a 2T front to a size 5 back, etc., but always double check!
When sewing all one size, but different fabrics, you can make piles separately by piece– i.e., all the collars in one pile, all the fronts in another.

While You Sew
9. Choose Favorites
Order your garments from “least favorite” to “most favorite” and always pin/iron/sew them in that sequence. In essence, your least favorite becomes a working muslin, allowing you to “practice” trickier steps and hone your skills before you get to your true favorite. Hopefully, you’ll have worked all the kinks out before getting to the “best” garment and if you do have a major disaster it’s less likely to be on your favorite!
So, how to choose a favorite? Any criteria works, really, but some questions to ask yourself might be:
What fabric do I like the most/least?
Which garment will provide the most versatility in my wardrobe?
Which garment do I think will be the most comfortable?
In case of a big mistake, which fabric do I have the most leftovers of?
10. All Together Now
If you try no other tip, this one is the essence of sewing multiple garments at once. Make it your goal to chunk as many of the same type of tasks as possible. For example, pin all sleeves in place at once, iron all hemlines at once, or sew all side seams at once. Whatever you do to one garment, to do all the rest before you move on!
11. Be a Rule-breaker
When I was first learning to sew, I would get frustrated because my mom would often tell me to do something differently than the instructions. Skipping steps, rearranging instructions, or doing something completely differently than instructed was all fair game for her, and with good reason. Her extensive sewing expertise made it easy for her to break the rules– almost always with good results. She didn’t break the rules in a sloppy way, but in a “this makes more sense and produces a better end result”-kind of way. I still can’t break the rules as well as my mom, but I’m trying, and you should, too!
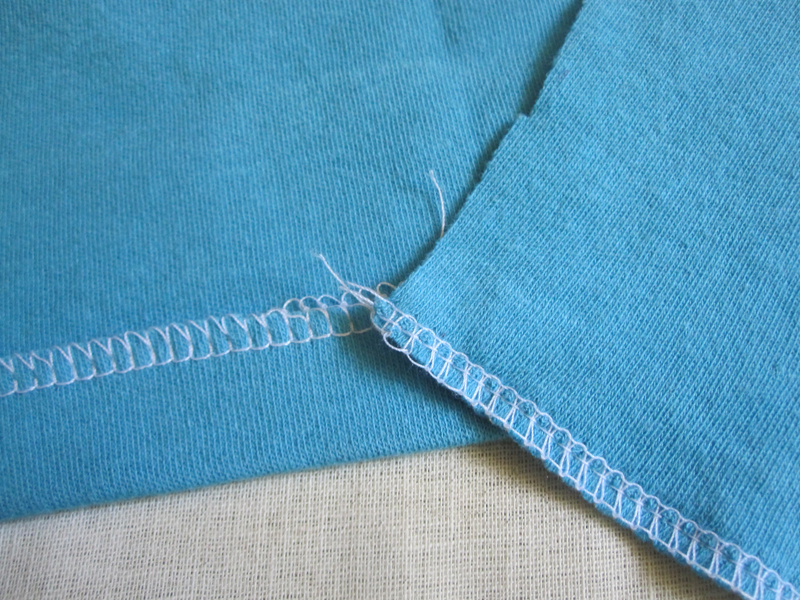
For example, because I was familiar with the t-shirt pattern I was using, I noticed that the instructions had me ironing: 1) shoulder seams, 2) neck bands, and 3) sleeve hems at different steps with little bits of sewing in between. Because none of the different things being ironed were dependent on the other, I took them all to the ironing board at one time for a massive ironing session. This eliminated multiple trips back and forth between my sewing machine and ironing board, and also enabled me to sit down and SEW for a long time, which always makes me feel like I’m really getting things done!
When a designer writes the instructions for a pattern, they probably don’t have assembly line type sewing in mind. Look for ways that you can rearrange or alter the order of garment assembly to better meet your needs.

12. Think Ahead
Avoid creating needless hassle for yourself. As you pin, lay everything in a neat stack with all of the pieces facing the same way. This makes it easy for you to quickly move from one thing to the next; if you have to reach into a jumbled pile and straighten things out before you start to sew, you’re wasting precious machine time!
Also, if you need to change stitches, machine feet, etc., do it as soon as you’re finished with your previous/current settings. When I knew I would be going from my overlock stitch and foot (for inside seams) to topstitching for hems, I took a few seconds to change everything over before I began pinning up my hems. Then, once the pinning was done, I could move seamlessly into sewing again.
What tips and tricks do you use to sew multiple items at once?